How to create a framework
This article walks through building a journey framework: the connected graph of journeys that holds your experience at more than one altitude. You will map the altitudes, create the journey at the top, and connect the journeys beneath it. It is for whoever is setting up a workspace for more than a handful of journeys, and you need journey editing permission at the Structure tier or above to follow it.
One thing to clear up first. There is no Create framework action, because a framework is not a separate object. You build it by creating journeys and connecting them to each other. Everything below is that process.
Before you start: map the altitudes
Sketch the structure before you build anything. On paper is fine, and it will save you a rebuild.
- Write down the one journey that describes the whole customer relationship end to end. That is your top altitude.
- List the major experiences inside it, such as "Buying a phone" or "Making a claim".
- For each of those, note the tasks detailed enough to deserve a journey of their own. Mark any that appear under more than one experience: those are the ones you will build once and connect in several places.
- Give each journey a provisional owner.
- For each altitude, write down the decision it supports and who makes it. If an altitude has no decision, you do not need it.
Two altitudes is a real framework. Do not add a third because it looks more complete. See Journey framework zoom levels.
Step 1: create the journey at the top
- Open the journey library from the left sidebar.
- Create a new journey, following How to create a journey.
- Name it for the whole relationship, for example "Customer lifecycle".
- Set its phases to the major stretches of the relationship. On a lifecycle journey these are broad, such as
Try,BuyandUse. - Add steps only where you will connect something or attach a metric. This journey is a dashboard, not a map, so resist mapping it in detail.
Tip: if your organization has a journey template for lifecycle journeys, apply it here instead of building phases by hand. Templates are managed in
Settings > Journey templates.
Step 2: add a Nested journeys lane
The lane is what lets a journey hold other journeys.
- Open the journey you just created.
- Add a lane from the lane header.
- In the
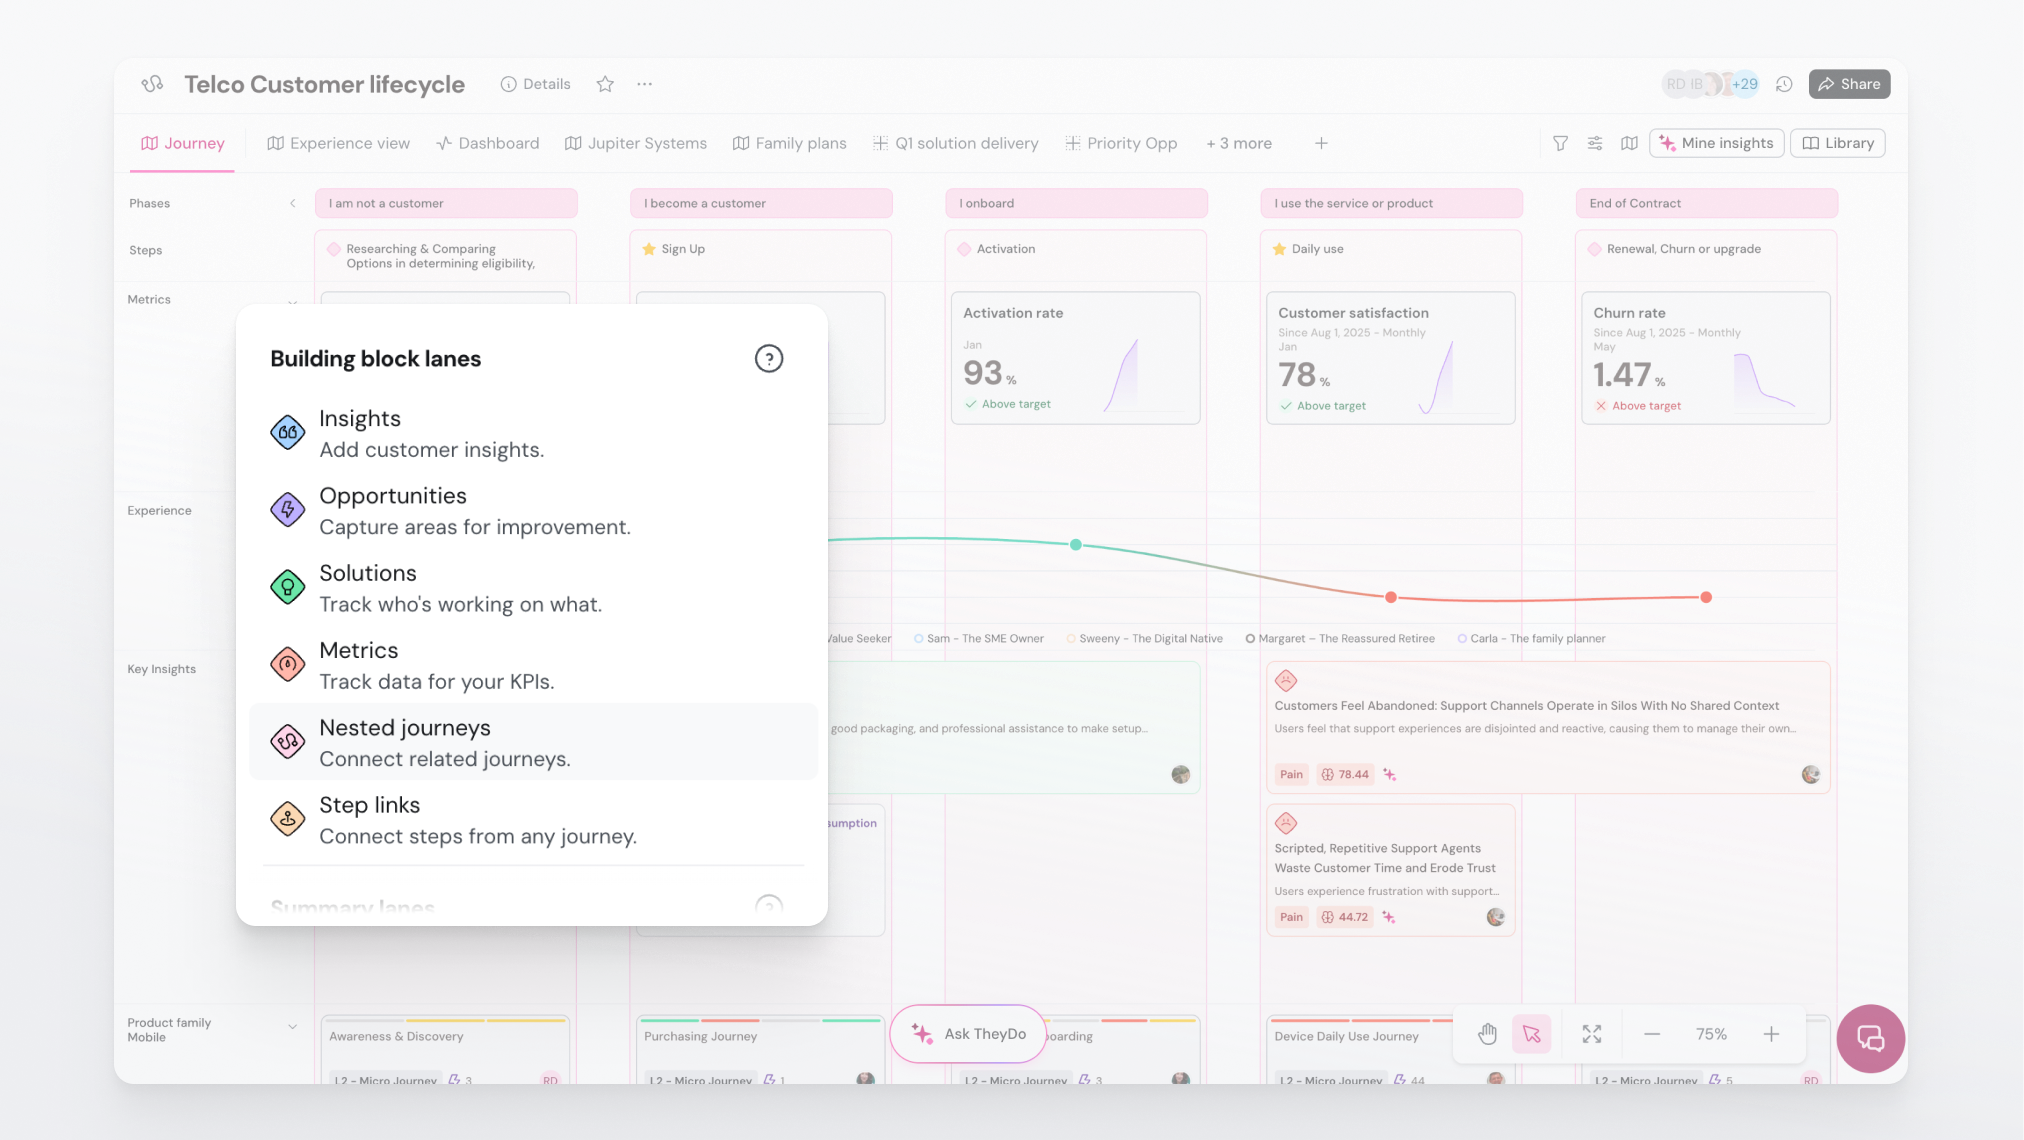
Add lanemenu, chooseNested journeysfrom the building block lanes group. - Name the lane for what it holds, for example "Journeys".
The lane runs across every step, so each step can now hold one or more journeys.
Step 3: connect the journeys underneath
Work through your sketch one journey at a time. The order of these two options matters: look for an existing journey first.
- Find the step where that experience begins.
- In the
Nested journeyslane on that step, link the journey. If the journey already exists in the workspace, link it rather than creating a new one. - Only create a new journey here when nothing suitable exists. Then open it and build out its phases and steps as normal.
- If the same experience also belongs under a different step or a different parent, connect it there too. It stays one journey with one owner and one set of evidence, reachable from both places.
- Repeat until every journey on your sketch is connected.
Then apply the same move one altitude down: open a journey from the row you just built, give it its own Nested journeys lane, and connect its children. A framework is this one move repeated at each height.
Note: connecting is a link, not a copy. The journey stays a normal journey in the library, editable in its own right, with its own owner and permissions. Nothing about being connected makes it subordinate.
Step 4: pin the framework in the sidebar
So people can find it without searching:
- Open the
Journey frameworkssection in the left sidebar. - Add your top journey to it using the search popover.
- Drag to reorder if you are pinning more than one.
Pinned journeys appear with their nested journeys underneath, which gives your team a permanent map of the structure in the navigation. Adding pins requires journey management permission.
Step 5: walk it once as a reader
Before telling anyone it exists:
- Open the top journey and confirm every journey card sits on the step you expect.
- Click into a few of them and confirm they open the journey you meant.
- Confirm anything that should be shared is connected in every place it belongs, rather than existing twice under different names.
- Confirm every journey has an owner.
- Confirm the naming is consistent within each altitude.
If your workspace shows an Observatory page, it is worth a look here: it draws the whole structure as a graph, which makes a missing connection or an unconnected journey obvious in a way the canvas does not.
Use AI to create a framework
Another way to design a framework, especially if you have a sketch on paper, in a Miro board or written down in a file: giving that to the TheyDo agent is a powerful way to get a full framework built out.
- Open the TheyDo Agent by clicking
Ask TheyDo. - If you already have other source data in the Data Hub, you can let the agent reference that as well.
- Paste or add your sketch and tell it to design the full framework.
- When it is done, click through and make any adjustments you need.
Tip: tell the agent to work in stages, confirming the structure with you before it builds the next part. That keeps you in control of the result.
Using a template
If your admin team has made journey templates available in your organization, you can skip the manual build and start straight from one of those. Templates are managed in Settings > Journey templates.
Where to go next
How to use frameworks in practice covers the day to day: moving between altitudes, reading progress that rolls up, and keeping the structure current as the portfolio grows.
Further reading
Reviewer note (remove before publishing): the "Use AI to create a framework" and "Using a template" sections were copy-edited on 2026-08-22 for house style:
Ask TheyDoput in backticks as a UI element, "Pro Tip:" converted to a> Tip:callout, curly apostrophes replaced, "adjustements" corrected, and the templates section pointed atSettings > Journey templates. No meaning was changed. Status was set back toIn reviewbecause the page changed after publishing. Reviewer note (remove before publishing): wording inconsistency to settle across this cluster. "Intro to journey frameworks" now says nesting attaches a journey to a phase of the journey above, while this article and the sentence following that line both say step. The product'sNested journeyslane places cards on steps. Pick one and make all three Frameworks articles agree.